Monday, 27 January 2014

Fine Art Work Diary

Evaluation of the shoot

I think that this shoot went really well.  I enjoyed being able to take photos of basically anything in order to represent fine art.  At first I wondered what I could take photos of in order to show fine art, then I realised that you take photos of anything, mainly flowers, plants and people tend to work best with this idea.  I also think that the images looked a lot better if they were close ups of particular subjects as it showed the real beauty of the subject when we can see right up close. These are a few of the images that I got from the photoshoot.


I think that both of these images show fine art really, the black and white over the top finalises the overall look of the fine art image which I think makes them look a lot better.

How can I use this technique?

I can use this technique in the majority of my work as it is not that hard to capture.  I could even do a photoshoot based entirely around the concept.  I could take lots of different images of lots of different flowers and plants and piece them all together in a fine art, multiple imagery way.  I think that this would actually be a really interesting shoot to experiment with.

Video Work Diary

Evaluation of the shoot

For this shoot I decided to work with a dark and eery idea so try and mimic a scary scene.  I thought that this would be a good idea because I could experiment with the lighting and also with the sound overlapping it and also with the speed of the clip.  I thought that it would be a good idea to experiment with the overall idea behind the shoot so I got a number of different shots to give myself a broad range to work with.

It all went well except for the lighting.  Sometimes it was a little too dark and it was hard to grasp the idea that I was trying to capture.  Overall I think that the shoot went well and I produced an eery looking video.


How can I use this technique.

I'm not 100% sure how I can use the idea of video in multiple imagery because it doesn't really work with it.  I could however, experiment with a short animation video, taking lots of different photographs of a journey somewhere and putting them into a video.  Another way that I could incorporate it would be to overlap two videos, however I am not too sure how I would do this.

Video


Video Technique Page


iMovie
  • Import the footage into iMovie and put the clips you want to use into the project timeline.
  • Arrange the order of clips by dragging them to where you want and deleting the areas that you don't want to use. 
  • To cut the clip, select it then use the markers by dragging to the points where you want the video to be cut too.
  • To add a title, credits and sound effects click on the icons underneath the video preview and chose the best one for the circumstance. 


Depth of Field Technique Page


Minimum Depth of Field
  • Set the camera to a large aperture. e.g. f1.4 (the larger the aperture the smaller the depth of field will be)
  • Get your model or focus to stand a good distance away from the camera and away from the background, so in between.
  • Take photograph.


Maximum Depth of Field
  • Set the camera to a smaller aperture, meaning the photo will take a lot faster. e.g f11. 
  • Get the model or subject/s in frame and take the photograph.
  • You will have a wide depth of field photograph.

Depth of Field Work Diary


Evaluation of the Shoot

This shoot was probably one of my more favourite photoshoots because I think that there is a lot of variation that you can include.  You can either concentrate on deep depths of field or shallow depths of field and you can either concentrate on a small detail in the photograph or have the whole image to be in focus so that the attention is drawn to every aspect.  The images that I got show all of these different techniques and I think that every image that I got shows a different type of depth of field, which is what I wanted to get from the very beginning, to show just how much variety that you can encounter when looking at depth of field.


When I first took this image, I wasn't overly happy with it because I thought that it was too bland and simple looking.  However, when I got it back and onto the computer, i realised that the simplicity of the image actually works in its favour as I think that the simple leaf with the detailed but blurred background works together to create a really interesting picture.


I also really like this studio made depth of field image because I think that it is a clear indication of the progression that you can get in using various depth of field methods to get the best possible photo.  I think that the way I managed to capture each individual face, but still give the front subject the most focus has worked really well, especially seeing as the second subject has a slight blur and then the furthest subject has a complete blur over the face, however, we can still see what the person looks like.  This is one of the main reasons that I really like this image.

Idea Development

When it comes to shooting depth of field, I don't think that I would do much different to how I did it in this shoot because I think that I showed the amount of different shots that you can get using depth of field.  To make this shoot better however, I could maybe have more of a focus rather than photographing the first thing that comes to mind which is probably what I will do when it comes to photographing multiple imagery in my next topic.


Monday, 20 January 2014

Personal Shoot 8 Edits


What I Am Going To Do Today

I am going to work on making my surrealism edits better so that they mimic the work of Thomas Barbey to the best of my ability.

I am also going to create a gif image for the sequencing shoot that I did.

Thursday, 16 January 2014

Best Work Powerpoint

What I Am Doing Today

Completing everything for the shoots that I have done this week.

- Shoot 8: Surrealism
- Shoot 9: Multiple Exposure Development
- Shoot 10: Sequencing

Edits and Work Records

Wednesday, 15 January 2014

Personal Shoot 8 Work Record - Sequencing

Preparation

In order to do this shoot I am going to book the studio to make sure that I have the appropriate amount of time that I am going to need to take all of the photos.  I also need to make sure that I have a model lined up to take photos of so that I won't be unprepared on the day.  I already have someone prepared to do this shoot for me, so that's already sorted out.  I need to also look over the technique pages for blurring and multiple flash as I want to add some technique work into this shoot as I think it will add an interesting effect to the overall shoot.

What I Hope To Achieve

When it comes to actually taking photos I am hoping that I am going to get a wide variety of different photographs, but so that I can piece them together or overlap them and for them to still make sense.  In this respect, when I am actually shooting I am going to make sure that I get a lot of images that follow this type of pattern.  It will make the editing process a lot easier for myself.  I am also hoping that I might be able to form a type of flipbook, however this isn't a main priority as I might make it a physical experiment rather than putting it in an entire shoot.  These are a couple of images that I have looked at as a form of inspiration.


What I Actually Achieved

I think that the shoot went really well and I am happy with the images that I got and also with the edits that I managed to make from them.  I got a good variety of images that have allowed me to edited them in a few different ways.  I experimented with overlapping images, lowering the opacity of them in the process so that you can see the features of all of the images.  I especially like the way that this effect turned out on the edits.  I also made a simple repetition image that I think turned out really well making me think that I should try and create some more of these to add the edits that I have already created.  I also made a couple of edits where I blended two images together as I think that they had a really good look to them.  These are two of my favourite edits from the shoot:


This was my most favourite edit from the shoot as I think it had a strong representation of multiple imagery involved in it.  I think that the way that I have managed to get all of the individual photographs at the appropriate opacity so that you can see the features of each of the photos.  I think that this effect looks really intriguing and the multiple imagery aspect reflects the different types of intense facial expression, which I think works really well in this sense. I also think that this image works a lot better due to the fact that I used a black background instead of another colour, which may not have worked as well.


This was my other favourite image.  I liked the way that I managed to get it to look like they are almost sitting opposite each other, which I thought added to the overall look of the image.  I was also torn between making the image black and white or leaving it in colour, so I decided to meet the differences and simply lower the saturation so that the colour that was in the image got darker and was leaning more towards black and white.  This effect looks a lot better than when it was just in colour or just in black and white, which is why I decided to leave it this way.

What I Am Going To Do Next

In regards to this shoot, I am going to experiment a little more with the type of edits that I can produce in order to further my overall project quality.  For my next shoot I am going to look at surrealistic ideas and create some work following the ideas presented in Thomas Barbey's work as he has been a constant photographer that I have been looking at throughout the entire project. 

Tuesday, 14 January 2014

Depth of Field Image Bank


The first image that I looked at for depth of field highlights how you can focus on one individual subject within a photo that has more than one subject in it.  I think that this particular photo shows really well the type of depth of field that you can get and also the most common.  When you want to focus in on one subject like in this photo, the best way to do it, is to literally make everything else fade out around it which I think this photographer has managed to do really well. 

The second image shows how you can focus on one particular feature on an individual subject.  Like in this picture, the photographer has focused on the cats head but also has the rest of its body in the shot.  I think that this is effective if you want to do a close up of a face like this photographer has done, but I think it works especially well on human features, such as eyes and mouths. 

The third picture I really liked because of the background that the photographer has created. I think that the gradual depth of field works really well in this picture because it brings the attention straight to the subject in the image, but it also allows you to take notice of the surrounding areas without being completely drawn away from the main subject.  I think that when I come to do my subject of multiple image I would like to experiment with this type of depth of field maybe creating a multiple image where the depth of field gets smaller.

The fourth image shows how you can use a very wide depth of field in order to capture a vast landscape.  I think that this type of depth of field works best when you are capturing landscapes because you can fit everything in that you can see, rather than focusing on one particular area.  I am going to use this method when it comes to capturing multiple imagery because I think it would be nice to make a multiple imager made up of landscapes.  I may even experiment with multiple exposures and this feature.

The fifth image shows a very deep depth of field where there is clearly a main subject and nothing should really take away from that.  The way that the photographer has put so much emphasis on the subject works really well and I would like to attempt something this advanced when it comes to photographing individual things.  I really like this image and everything that is in it.

The final image is a lot like the fourth, showing a wide depth of field to capture every inch of the photographers landscape.  I think that this photos shows exactly what I mean when I saw that wide depth of fields are perfect for taking photos of landscapes because everything stays in focus and you can see everything clearly because everything is just as important as the area next to it.

Monday, 13 January 2014

Personal Shoot 11 Work Record - Flowers


Personal Shoot 10 Work Record - Facial Features

Preparation

In order to do this shoot, I need to make sure that I have enough space to get a wide variety of facial features from a wide variety of different people, I think that I will be able to do this through using ideas used in photo joiner.  I want to get a lot of different eyes, noses, mouths and other important facial features and piece together all random aspects of it to create a multiple imagery photograph made up of lots of different people.  I think that this idea will work quite well as everyone is different so the photo will highlight the variety in people, which I think is what one aspect of multiple imagery photography is about.

What I Hope To Achieve

I hope that I am going to be able to get my point across in this shoot, which is that everyone's different but we are made up of the same features.  I hope that this idea will present itself in the photographs that I am going to create.  These are the types of images that I cam going to create a replicate in my own way.  These images are quite basic and the photographer has changed the colouring of a lot of them, which is something that I want to change.  I want all of the colours to be normal so that you can truly see the true differences between the people.


What I Actually Achieved

I managed to get some good shots, piecing together a few final images that I am really happy with.  It would have been nice to get more of a variety of people, but I had a limited amount of time.  However, I think that within the circumstances, I was able to create some interesting looking images that represent what I was trying to show.  This being, that everyone is different but we are all technically the same and as one, much like the photos above demonstrate. 

This was the first image that I created and I think that I could do a lot more with the idea.  When I first started putting this together, I tried to make sure that all of the images were the same colour, contrast, brightness and exposure wise.  However, when it came to actually putting it all together, I realised that it makes for a better image if they are different colours as it adds to the overall effect.  I like the way that you can tell that it is not the actual person's features but it still looks like a person in general.  This is what I was generally going for when I was doing this shoot. 
What I Am Going To Do Next

I am going to create many more of these photographs, expanding on the variety that I have in the actual image.  I am also going to experiment more with the quirkyness of the images that I am creating.  For my next shoot I am going to take lots of different images of both faces and nature and piece them together in photoshop to create hand made multiple exposures. 

Personal Shoot 9 Work Record - Surrealism

Preparation

For this shoot I am not entirely sure how I am going to capture what I want to achieve but I am hoping that I am going to be able to get a good variety of images that I can piece together in a kind of multiple exposure way, but also through highlighting  the ideas of surrealism and how they can be presented through the use of multiple imagery.  I am going to make sure that I have a good location in mind and that I am able to get the correct lighting in order for me to piece all of the different images together.  I am planning on putting together 3 to 4 images in order to create the surrealistic environments as I think that the more images that are in the image, the more advanced and developed the final image looks.  I am also going to make sure that I have a wide variety of shots, so that I have a lot of choice when it comes to actually editing the photographs.

What I Hope To Achieve

For this shoot, I am looking at the work of Thomas Barbey in particular for inspiration, as he is the main photographer that I have looked at in regards to surrealistic multiple imagery.  All of his work captures the surrealistic idea extremely well, which is why I am basically basing the entirety of my shoot on replicating his own work, but in my own style.  After looking through all of his work, I like the way that he pieced together shoots from both the forest/woods and the city, to make them blend into one which I thought was very clever.  Here is an example of what I am talking about and also what I am looking at mimicking.


Both of these images are quite advanced in the way that they have been edited so I don't think that I would be able to replicate the idea exactly as I obviously can't get some particular images needed to create these advanced edits.  I can however, use the editing ideas as inspiration in my own work, which is what I am aiming to do when it comes to editing all of the images together.  

What I Have Achieved

I managed to get some good shots for this shoot, although I think that I could've got a few more of a more busy lifestyle, however I couldn't get to somewhere where there would be more people.  Even so, I managed to get some very simple images that allowed me to create a really nice and advanced looking surrealistic photograph.


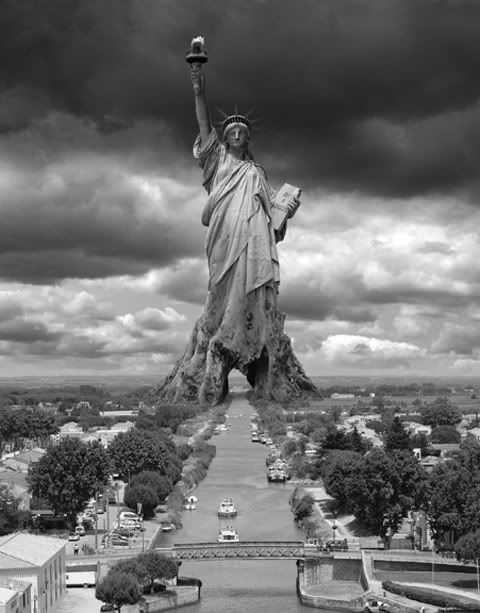
This was the main edit that I produced from the shoot and I am really happy with how it turned out.  The basic idea behind this particular photograph, was to make it look like there was a secret world as such, inside of the tree trunk which I think I have managed to portray well.  The photo of the door within the hole in the tree makes it look like a sort of never ending photo that can continue to develop.  I added the clouds at the top of the image to add to the overall idea of the surrealism in the photograph.  I think it added to the overall look of the image, making it look like the tree is it's own sort of world with it's own specific environment.


I am also really happy with how this edit turned out.  I didn't have much idea for this edit, I just hoped that I could put some images together and that it would look effective, which I think I have done to a good level.  One again, I used the black and white effect so that everything would look a lot cleaner and put together.  I think that the way I have managed to make it look like the two women are walking into the tree.  I also thought that it would be a good idea to include the clouds at the top of the image to make it look like the tree has it's own environment.


What I Plan To Do Next

Within this shoot, I am going to expand the amount of edits that I have done, so that there is more of a range, developing many more surrealistic ideas.  In regards to my next photoshoot, I am either going to look at fine art, multiple exposure developments or a change in time photoshoot, which I think would be the most interesting to explore. 


Thursday, 9 January 2014

Personal Shoot 12 Work Record - Multiple Exposure Development

Preparation

I am going to look back over the photos that I did in my multiple exposure experimentation photoshoot to see how I can develop the images.  I am going to make sure that I take a lot more photographs so that I can piece a variety of images together to develop the images that I am creating.  I am also going to make sure that I have fully looked into the work of Christoffer Relander and Aneta Ivanova so that I have a full understanding of multiple exposure and how I can take inspiration from their work.  I am going to make sure that I get to a location where I can get a multitude of different types of images, along with arranging a model so that I can piece together a lot of different images.

What I Hope To Achieve

I hope that I am going to be able to get a good variety of images so that I can get a lot of developed multiple exposure images.  I hope that throughout this shoot, I am going to be able to mimic the work of Ivanova and Relander to a high standard, but also adding my own flare to the images that I am going to create.  I think that both of these images show to a high standard the type of image that I want to create. Obviously this is very advanced and i may not be able to get shots exactly like this but I hope that I might be able to get something similar.


Fine Art Image Bank


This image really stood out to me as soon as I saw the image.  To me, it seems as though there has been a technique of blurring which I think is really effective when you are trying to make the sky look like it is moving without actually capturing the movement.  Through the way that the photographer has set the camera to a longer exposure on a tripod so that the area that is set still doesn't move and the sky that is moving is all blurred into one continuous shot rather than having individual clouds in the sky.  I love the way that the black and white effect adds to the overall blurring effect that the photo gives off.  This effect is also apparent in the water that is surrounding the dock/path/walkway.  The effect of the blurring has made the water look like a kind of baron wasteland and also somewhat like it is made of sand.


This image really caught my eye as soon as I saw it.  The pale nature of the image with the bright bold eyes, makes it a stand out image against other more basic portraiture photography.  The photographer (Oleg Dou), creates an outstanding portfolio of images very similar to this and all of the work follows a similar idea to this, creating a simple fine art photograph.  This image in particular stood out to me because of all of the words that are written over the model's face.  I think the photographer is maybe trying to show the audience that a person cannot be defined by words which I think is a powerful message.  The way that he has essentially eradicated the strong facial features that we are most likely looking for in portrait photography is important because it highlights how we can still be captivated by an un-conventional image.  The very clean and almost porcelain look of the face is was makes this fine art photograph, really stand out in the competitive industry.


When I first saw this image, I didn't automatically see it as a fine art image.  However, the more you look at it and understand the most likely background or story in the image, the more you can appreciate it as a fine art image and understand deeper into the meaning of the image.  WE are clearly looking at a person who is in a lot of pain or has experienced a lot of pain.  We can see this through the facial expression and the state of her face.  I also think that it is important that the photograph has been taken through a sort of jail flap, showing that the person we are looking at is unimportant and most likely does not have that much dominance.  The fine art in the image is the story and the look in the eyes of the model.  The more you look at the image, the more you feel like you can relate and understand which is important in this type of fine art photography. 


This photo is really intriguing to look at.  I like the way that the cloud almost looks supported by the tree underneath it.  I think that this idea has a metaphorical background behind it although i'm not sure what it is trying to represent.  Either way, I think that the photograph has got a lot of depth and I love the way that the photographer has managed to get the image across to the audience.  


Much like the first image, this photographer has decided to use the technique of blurring in order to capture the flow of the waterfall, which I think makes the photograph look so much more developed and interesting.  The smoothness of the water flowing down the side of the mountain, replicates the relaxing nature that waterfalls tend to show and make a person feel. As the aperture has been left open for a long time, the photographer has been able to capture the flowing of the water which I think makes for a really effective fine art image.


This image of an elephant has a strong effect on an audience because of the slight HDR effect that this fine art image gives off.  I really like the simpleness of the image and also how the photographer has very simply just taken a photo of an elephant and made sure that it is in the middle of the photograph.  I also think it captures the simple beauty of the elephant, going about it's daily business, drinking water.  The fact that it is doing nothing special and still manages to capture a really beautiful image is important in fine art image.